スマートキャンプでボクシルのエンジニアをしている井上です。
本記事はスマートキャンプ Advent Calendar 2019 - Qiitaの20日目の記事です。
個人的に遊んでいるAuth0について書いてきます。
前回はAuth0でのよくある認証をAuth0 Nuxtで実装しましたが、 今回は前回の作成したものを使って、Auth0でJWT認証をやってみたいと思います。
前回の記事はこちら tech.smartcamp.co.jp
- JWTとは
- Auth0を設定する
- Rails側のJWTサンプルをダウンロードしよう
- ダウンロードしたRails sampleを起動する
- Rails側が何やってるのか一応触れる
- Nuxt側にJWTの設定を追加しよう
- JWTで認証を試してみる
- まとめ
JWTとは
Auth0を設定する
前回作成したAuth0の設定に加えてAPIを追加していきます。
Auth0にログインしたら下記のようにAPIに移動します。

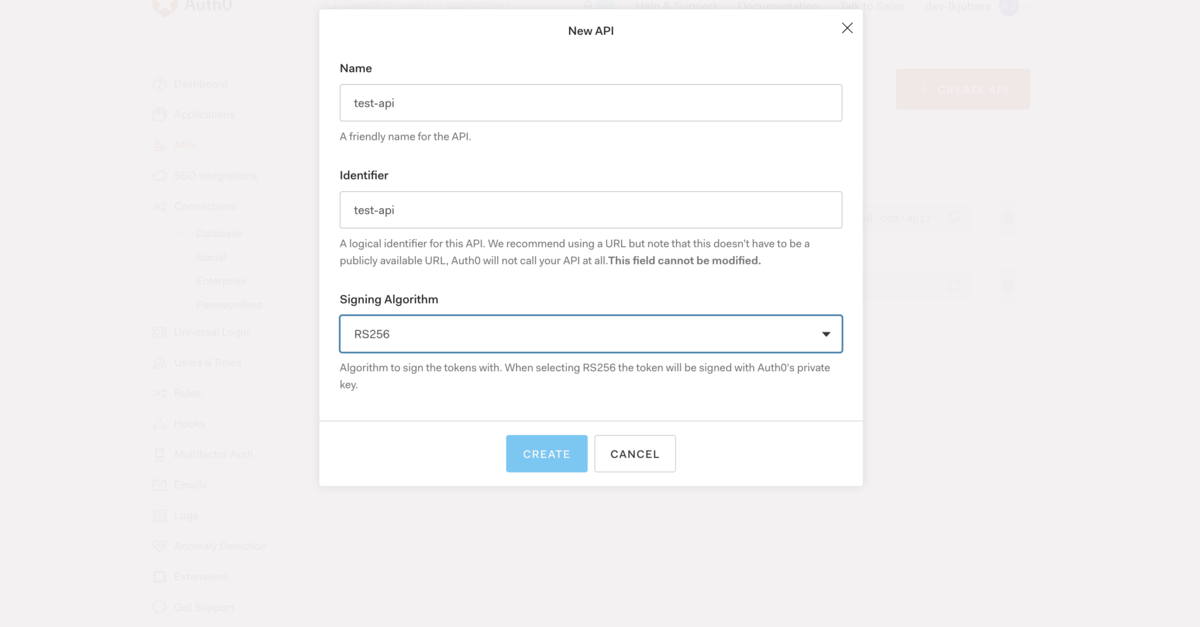
移動後にAPI Createを押下すると、下記のような画面が表示されますので それぞれ、Nameなどを下記のように設定していきます。
Name: test-api
Identifier: https:/ test-api
Signing Algorithm: RS256

作成ボタンを押すとAPIが作られます!

Rails側のJWTサンプルをダウンロードしよう
Auth0ではsampleの実装を公開していますので、それを使用して行います。 また、事前にプロジェクトを作ったことで.envに必要な設定が記載された状態で作成できます。
ダウンロードしたRails sampleを起動する
プロジェクト直下に移動してdocker環境を起動してみましょう!
docker build -t auth0-rubyonrails-api-rs256 .
docker run --env-file .env -p 3010:3010 -it auth0-rubyonrails-api-rs256
これでRailsアプリが立ち上がります!
アクセスしてみると、下記のおなじみのRails画面が表示されるかと思います。

Rails側が何やってるのか一応触れる
PrivateController
今回、JWTリクエストを送るのは自動生成されたPrivateControllerのprivateアクションです。
ここにリクエストを送って、Hello from a private endpoint!のメッセージが帰ってくればJWT認証が成功となります。
# frozen_string_literal: true
class PrivateController < ActionController::API
  include Secured

  def private
    render json: { message: 'Hello from a private endpoint! You need to be authenticated to see this.' }
  end

  def private_scoped
    render json: { message: 'Hello from a private endpoint! You need to be authenticated and have a scope of read:messages to see this.' }
  end
end
Secured module
JWTを受け取って、認証されているかどうか返す部分をSecuredというmoduleで作成しています。
これをcontroller側でincludeすることで、before_actionでJWT認証をおこなうようになっています。
# frozen_string_literal: true
module Secured
  extend ActiveSupport::Concern

  SCOPES = {
    '/api/private'    => nil,
    '/api/private-scoped' => ['read:messages']
  }

  included do
    before_action :authenticate_request!
  end

  private

  def authenticate_request!
    @auth_payload, @auth_header = auth_token

    render json: { errors: ['Insufficient scope'] }, status: :forbidden unless scope_included
  rescue JWT::VerificationError, JWT::DecodeError
    render json: { errors: ['Not Authenticated'] }, status: :unauthorized
  end

  def http_token
    if request.headers['Authorization'].present?
      request.headers['Authorization'].split(' ').last
    end
  end

  def auth_token
    JsonWebToken.verify(http_token)
  end

  def scope_included
    # The intersection of the scopes included in the given JWT and the ones in the SCOPES hash needed to access
    # the PATH_INFO, should contain at least one element
    if SCOPES[request.env['PATH_INFO']] == nil
      true
    else
      (String(@auth_payload['scope']).split(' ') & (SCOPES[request.env['PATH_INFO']])).any?
    end
  end
end
JsonWebToken Class
そして、実際にJWTの認証をしてるのは下記のJsonWebTokenです。 ここで、decodeする際にAuth0のdomainなどを使用してます
# frozen_string_literal: true
require 'net/http'
require 'uri'

class JsonWebToken
  def self.verify(token)
    JWT.decode(token, nil,
               true, # Verify the signature of this token
               algorithm: 'RS256',
               iss: "https://#{Rails.application.secrets.auth0_domain}/",
               verify_iss: true,
               aud: Rails.application.secrets.auth0_api_audience,
               verify_aud: true) do |header|
      jwks_hash[header['kid']]
    end
  end

  def self.jwks_hash
    jwks_raw = Net::HTTP.get URI("https://#{Rails.application.secrets.auth0_domain}/.well-known/jwks.json")
    jwks_keys = Array(JSON.parse(jwks_raw)['keys'])
    Hash[
      jwks_keys
      .map do |k|
        [
          k['kid'],
          OpenSSL::X509::Certificate.new(
            Base64.decode64(k['x5c'].first)
          ).public_key
        ]
      end
    ]
  end
end
Nuxt側にJWTの設定を追加しよう
続いてNuxt側に設定を追加していきます。
設定は先ほどnuxt.config.jsに追加した, auth部分に下記のように追加するのみです。
//nuxt.config.js

  auth: {
    strategies: {
        auth0: {
          domain: 'Domain',
          client_id: 'Client ID'  ,
        scope: ['openid', 'profile'], // 今回追加,
        response_type: 'id_token token',// 今回追加,
        token_key: 'id_token'// 今回追加,
        }
    },
    redirect: {
      login: '/login',
      logout: '/logout',
      callback: '/callback',
      home: '/mypage',
    },
  },
JWT認証をやるためaxiosのheaderにtokenを設定します。
また、ここは新規でplugins/axios.jsを作成します。
//plugins/axios.js

export default function({ $axios, store }) {
  $axios.interceptors.request.use(config => {
    config.headers.common['access-token'] =
      store.$auth.$storage._state['_token.auth0']
    config.headers.common['Access-Control-Allow-Origin'] = '*'
    config.headers.common['access-token'] =
      store.$auth.$storage._state['_token.auth0']
    return config
  })
  $axios.onError(error => {
    console.log(error)
    console.log('opps')
  })
}
また、nuxt.configのpluginsにも設定を追加します
//nuxt.config.js

  plugins: [
    '@/plugins/element-ui',
    '@/plugins/axios', // 今回追加
  ],
mypage.vueをまるっと下記に書き換えます。 もはや, mypageとは?という状態ですが遊びなので許してください
//mypage.vue
<template>
  <el-container>
    <el-form>
      <el-button type="primary" @click="jwtRequest"
        >JWTを試す
      </el-button>
    </el-form>
  </el-container>
</template>

<script>
export default {
  methods: {
    jwtRequest: function() {
      this.$axios
      .get('http://dockerのip:3010/api/private')
      .then(response => {
        confirm(response.data.message)
      })
    }
  }
}
</script>
JWTで認証を試してみる
ログインする
ログインボタンを押下して、下記の画面が表示されるかと思いますので、
Google認証でログインしましょう!

JWTリクエストする
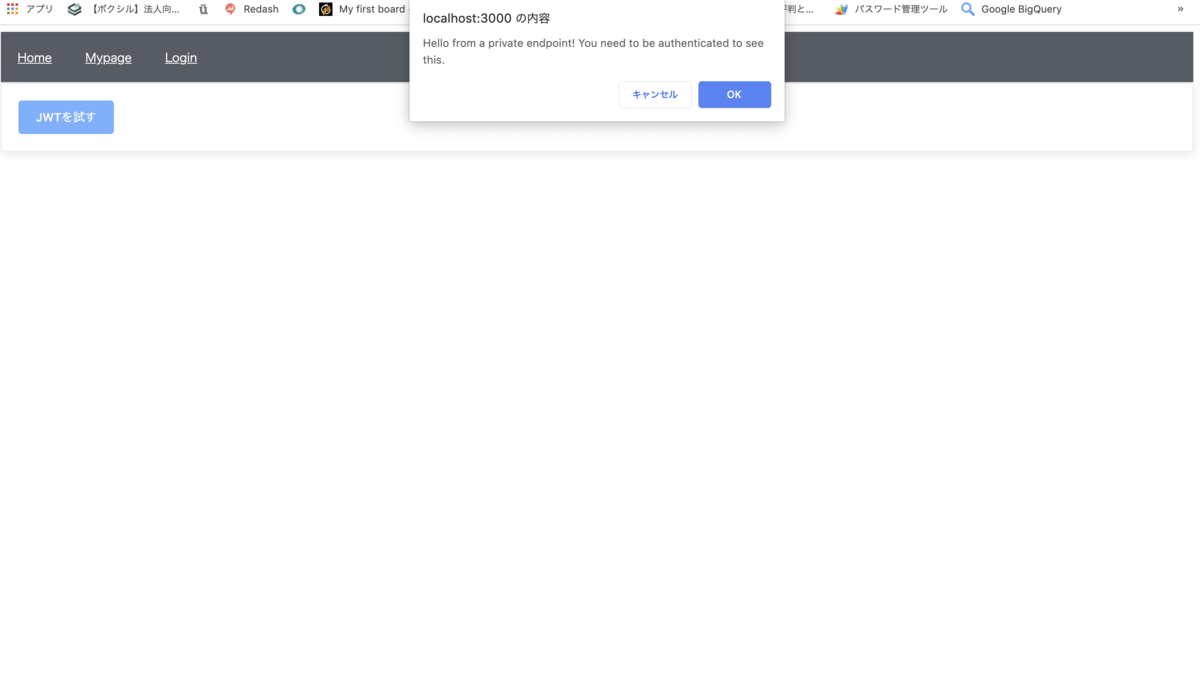
/mypageに移動しJWTを試すボタンを押下

認証に成功すると、Rails側からJWT認証が通ったとメッセージが帰ってきます

まとめ
Auth0でJWTはサンプルもあることで、かなりか簡単に試せるようになってますね!
auth0ようのmoduleもあったりなど、今後より使いやすくなっていくのが楽しみですね